Introduction
AkumaKodo (Pronounced: Ah-Ku-Ma Code Oh) is a discord deno bot framework written
in TypeScript and deno. It is designed to be a modular and extensible framework that
extends the functionality of the deno runtime. It is designed to be easy to use while
maintaining a high level of performance.


The framework is build on discordeno version 13.0.0-rc18
Inspiration
We took inspiration from these frameworks to help develop AkumaKodo into the tool it is today, thanks to all these great developers!
Why use AkumaKodo
- Command driven framework
- Utilities to make development easier
- Internal framework debug mode
- Pre-built Database providers
Why not use AkumaKodo
- You don't know javascript basics.
- Don't want to use the deno runtime.
- You like functional programming only.
Installation
deno install https://deno.land/x/akumakodo@0.1.6/mod.ts
akumakodo will be installed in your deno cache
Example bot
import { AkumaKodoBotCore } from "https://deno.land/x/akumakodo@0.1.6/mod.ts";
import { config as dotEnvConfig } from "https://deno.land/x/dotenv@v3.1.0/mod.ts";

const env = dotEnvConfig({ export: true });
const TOKEN = env.DISCORD_BOT_TOKEN || "";

// Bot configuration
const Bot = new AkumaKodoBotCore(
    {
        botId: BigInt("your-bot-id"),
        events: {},
        intents: ["Guilds", "GuildMessages", "GuildMembers"],
        token: TOKEN,
    },
    {
        optional: {
            // False by default but we recommend using the built
            // in logging system until your app hits production.
            bot_debug_mode: true,
            // Enables the built in events in the framework
            bot_internal_events: {
                // Allows the bot to reply to slash commands
                interactionCreate: true,
            },
        },
        required: {
            // needed if you wish to use test slash commands.
            bot_development_server_id: BigInt("your-guild-id"),
        },
    },
);

// Our own custom event handler
Bot.client.events.ready = (_, payload) => {
    Bot.container.logger.log("info", "ready", "Online and ready to work!");
};

// Creates a command
Bot.container.utils.createCommand(Bot, {
    trigger: "ping",
    description: "ping pong",
    scope: "Development",
    run: async (interaction) => {
        await Bot.container.utils.createCommandReply(
            Bot,
            interaction,
            {
                embeds: [
                    Bot.container.utils.embed().setColor("random")
                        .setDescription("pong!"),
                ],
            },
            false,
        );
    },
});

// Creates ws connection and starts listening
await Bot.createBot();
Now simply run the script below to start your bot!
deno run -A ./<file>.ts
Table of Contents
New to programming with discord? Read here.
Learn about AkumaKodo Framework Read here.
Read common framework errors Read here.
New Discord Bot Developers
Programming basics
Before starting, you should have a basic understanding of how to write code in typescript. Typescript fundamentals are needed to use and extends this framework to the fullest extent.
Learn about typescript here.
If you are new to programming with the discord api I also recommend read the discord api documentation. You can find a lot of helpful information there. Check out the Seven Steps if you have not already 😁!
You can also learn more about discord bot development on YouTube, in discord servers, and reddit.
Creating a bot application
Assuming your reading to make your first discord bot, we will start with the basics.
First, we need to go to the discord developer portal and create a bot account.

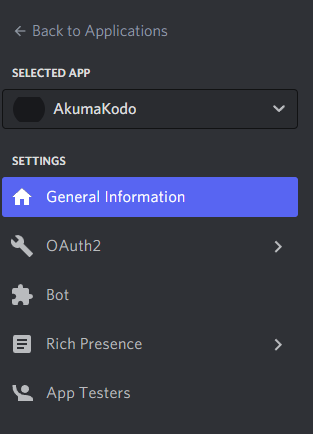
Next click on the bot tab and create a new bot application.

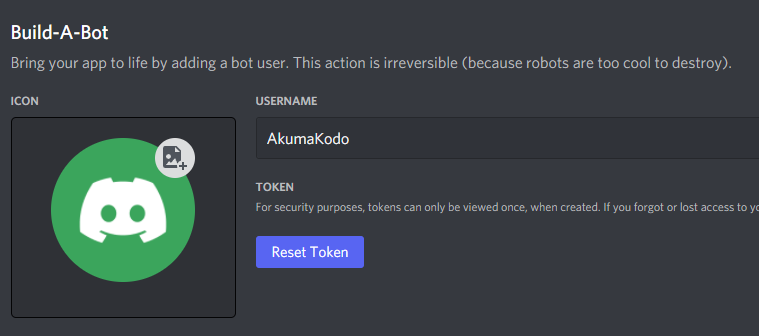
Your bot should be created.

Make sure to copy and paste your token for later than you will need this to authenticate with the discord api.
Now that you have a bot application, you can connect to the AkumaKodo framework and start creating your bot! Keep reading in the next chapter.
AkumaKodo - Chapter 1: The Basics
Now that you have your bot application from discord, we can get started creating your bot.
Creating a mod.ts file
Now create a file on your computer called mod.ts or whatever you like, this file will be your main program file for your bot. This file will container all the
startup functions, loaders, and any configurations you need.
The AkumaKodoBotClient is an extension of Bot from discordeno so all methods are available in the bot instance as well.
mod.ts
const Bot = new AkumaKodoBotCore(
    // Required deno Options to start the bot
    {
        botId: BigInt("your-bot-id"),
        events: {},
        intents: ["Guilds", "GuildMessages", "GuildMembers"],
        token: "your-bot-token",
    },
    // AkumaKodo options
    {
        optional: {
            bot_debug_mode: true,
        },
        required: {
            bot_development_server_id: BigInt("your-dev-guild-id"),
        },
    },
);

Bot.createBot();
And with that your bot will login to the discord api and be online!
Creating commands
Creating your first command in AkumaKodo is simple. On your Bot variable, simply access the createCommand function.
Bot.container.utils.createCommand();
This is a utility function to help you create slash commands using the discord api. Under the hood it uses discordeno's rest api to POST to commands. You can read all the available options for a command here
The base options are here:
// Showing the typings:

// the command trigger that runs the command
trigger:
string;

// The command description
description:
string;

// The command scope
scope:
CommandScopeType;

// Runs the command callback
run:
((data: DiscordenoInteraction) => unknown);
Using this interface we can build our command below.
Bot.container.utils.createCommand(Bot, {
    // The command name
    trigger: "ping",
    // The command description
    description: "Ping me!",
    // The scope - sets the slash command to global or guild only
    scope: "Development",
    // Command callback to run when called
    run: async (interaction) => {
        return await Bot.container.utils.createCommandReply(
            Bot,
            interaction,
            {
                embeds: [
                    Bot.container.utils.embed().setColor("random")
                        .setDescription(
                            `🏓Pong!`,
                        ),
                ],
            },
            false,
        );
    },
});
Simple Command explained
The first thing need to make a command is a trigger. You can think of this as a keyword AkumaKodo will use when creating your slash command.
The second param is the command description and it should be short and to the point. If you want a longer one, you can use the extendedDescription.
The third param is the scope. This controls if the command should be published as a global command or development only. As of version 0.1.2 this is required by default
but in the future we may enabled development by default for scopes.
The forth and most fun param is run! This function takes a type of DiscordenoInteraction We use this interaction data to execute and respond to the command.
The framework has a built in utility function for responding to slash commands and its called createCommandReply. Simply fill out the options and send your response!
Keep in mind all the params above are required to run create any command, more addons can be found here.
Creating events
Events are simply to create. We simply use Discordeno's internal event handler. You can access it using:
Bot.instance.events.ready = (_, payload) => {
    // Do something...
};
You can use the payload param to access more data on the event. The first param can be used to access the bot instance from discordeno.
Template Bot
FYI - If you want to have a simple starter project out of the box, use our template!
On the next page we will cover command handling and how you can create a more complex file structure for application.
Common Errors
When developing in any technology we often come across some hardships, well here is a list of possible errors you may see in our framework when developing and how you can possibly fix them.
Remember, you can always ask more questions at our @discord server if nothing here helps.
Framework Errors
Authorization token 403
[403] The Authorization token you passed did not have permission to the resource.
at Object.runMethod
(https://deno.land/x/discordeno@13.0.0-rc18/src/rest/runMethod.ts:21:9)
at upsertApplicationCommands
(https://deno.land/x/discordeno@13.0.0-rc18/src/helpers/interactions/commands/upsertApplicationCommands.ts:19:33)
If you have seen this error on start-up of your bot it could mean a few things:
-
You don't have permissions to upload slash commands in this server. In discord, a bot needs to be in the server to upload slash commands. So make sure your development guild id in your bot configuration is correct. Review this page for the first steps.
Also keep in mind that discordeno uses type BigInt over number so make sure you entered your application id as
BigInt("your-id"). This goes for your guild id to. -
Another reason for this error may be your bot was not invited with the
application.commandsscope. Make sure your bots invite url has this scope, kick the bot and reinvite it.Example url: https://discord.com/api/oauth2/authorize?client_id=your-id&permissions=0&scope=bot%20
applications.commands
Owner Only Commands
In AkumaKodo command have the param devOnly. The command handler checks the cache for the list of bot owners by id on each command with this param.
If your the bot owner make sure you have:
bot_owners_ids: [BigInt("your-id")],
in your bot configuration. At startup, the bot will save this Array of BitInt ID's. If you want you can also fetch all bot application owners from the discord
api. You can enabled bot_fetch_owners: true.
API
AkumaKodo is built around discordeno, so you can find its api documentation here.
Api docs for AkumaKodo will be available later.
Yoki
Yoki is japanese for "Collection".
This package is a utility extension of the javascript map class and can be found in the Yoki repository.
Usage documentation / examples coming soon...
The Seven Steps of Programming
Many novice programmers attempt to dive right into writing the code (in the programming language) as the first step. However, writing the code is actually a much later step in the process. A good programmer will plan first and write second, possibly breaking down a large programming task into several smaller tasks in the process. Even when cautioned to plan first and code second, many programming students ignore the advice—after all, why “waste” 30 minutes planning when you are time-crunched from all the work you have to do. This tradeoff, however, presents a false economy—30 minutes planning could save hours of trying to make the code work properly. Well planned code is not only more likely to be correct (or at least closer to correct), but is also easier to understand—and thus fix.
To try to better understand the importance of planning before you write, imagine an analogy to building a house or sky scraper. If you were tasked with building a sky scraper, would you break ground and start building right away, figuring out how the building is designed as you go? Hopefully not. Instead, you (or an architect) would design blueprints for the building first. These blueprints would be iteratively refined until they meet everyone’s specifications—they must meet the requirements of the building’s owner, as well as be possible to build reasonably. Once the blueprints are completed, they must be approved by the local government. Actual construction only begins once the plans are fully completed. Programming should be done in a similar manner— come up with a complete plan (algorithm) first and build (implement in code) second.
We said that the heart of programming is to figure out how to solve a class of problems—not just one particular problem. The distinction here is best explained by an example. Consider the task of figuring out if a particular number (e.g., 7) is prime. With sufficient knowledge of math (i.e., the definition of a prime number and the rules of division), one can solve this problem—determining that 7 is in fact prime. However, a programming problem typically looks at a more general class of problems. We would typically not write a program to determine if 7 is prime, but rather a program which, given a number N, determines if N is prime. Once we have an algorithm for this general class of problems, we can have the computer solve any particular instance of the problem for us.
When we examine a class of problems, we have parameters which tell us which particular problem in the class we are solving. In the previous example, the class of problems is parameterized by N—the number we want to test for primality. To develop an algorithm for this class of problems, we must account for all possible legal values of the parameters. As we will see later, programming languages let us restrict what type of information a parameter can represent, to limit the legal values to those which make sense in the context of the problem. For primality testing, we would want our parameter N to be restricted such that it can only hold integer numbers. It would not make any sense to check if letters, words, or files are prime.
To write a program which takes any number N and determines if N is prime, we must first figure out the algorithm for this class of problems. As we said before, if we attack the problem by blindly writing code, we will end up with a mess—much like constructing a sky scraper with no plan. Coming up with the appropriate algorithm for a class of problems is a challenging task, and typically requires significant work and thought.

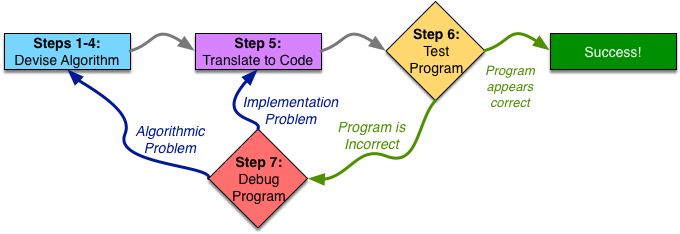
This figure shows a high-level overview of the programming process. A programmer starts by devising the algorithm for the task they are trying to solve. We will split this planning phase into four steps in the process of writing a program, which we will discuss in more detail shortly. At the end of these four steps, the programmer should have a complete plan for the task at hand—and be convinced that the plan is a good one.
Devising an algorithm takes first four steps: working on an example, writing it down what they did, generalizing those steps and will testing them.

After devising a proper algorithm, they are ready for Step 5 of the programming process: translating her plan into code in the programming language they are using for her current project. Initially, translation to code will go slowly, as you will be unfamiliar with the syntax, likely needing to look up the specific details often. However, even if slow, it should be fairly straightforward. You already devised the plan, so you should have done all the actual problem-solving tasks already. Your algorithm may have some complex steps, but that is fine. As we will see later, whenever your algorithm calls for a step that is too complicated to be simply translated into a few lines of code, you should turn that step into its own separate programming task and repeat the programming process on it. In the next course, we will discuss translation to code in much more detail, as well as how to turn the code into something that the computer can run.
Once the algorithm is implemented in code, the programmer must test her code, which is the 6th Step of the programming process. By testing the program, the programmer tries to uncover errors in her algorithm or implementation. If the programmer finds errors in her program, they debug the program (Step 7): finding out the cause of the error, and fixing it. The programmer may need to return to the algorithm design steps (if the error lies in the algorithm) or to translation to code (if the error lies in the implementation) to correct the error. The programmer then repeats all of the later steps. At some point, the programmer completes enough test cases with no errors to become convinced that her program is correct. Note that we said the programmer becomes convinced that her program is correct. No amount of testing can guarantee that the program is correct. Instead, more testing increases the programmer's confidence that the code is correct. When the programmer is convinced her code is correct, they've successfully completed the task at hand. We will discuss testing and debugging in much more detail in the next course.
Contributors
Here is a list of the contributors who have helped to improve AkumaKodo. Big shout-out to them!
If you feel you're missing from this list, feel free to add yourself in a PR.
AkumaKodo
All notable changes to this project will be documented in this file.
The format is based on Keep a Changelog and this project adheres to Semantic Versioning.
0.1.6 - 2022-03-28
Stable release for production.
Added
- Updated documentation for v0.1.6
- Support team only command checks.
Changed
- Added optional slash command updater
Fixed
- More export options to mod.ts file
- Cool down handler bug with not replying to commands.
0.1.4 - 2022-03-27
Finishing up basic framework features, and making it stable for production.
Added
- Command guild only protection.
- Command DM only protection.
- Components for commands: Button, TextInput, SelectMenu.
- More utility helper functions
- Application component handler
Changed
- Added error handling to createBot function.
- Provider object no longer needed in config by default.
- Providers no longer automatically register using the bot configuration.
Deprecated
- Removed provider configurations from the bot object. From now on users will have to import and manage their own providers.
Removed
- Button creation utility.
- Task initialization on bot startup by default.
- Mongodb provider until i fix it.
Fixed
- Owner Only command checks not caching owners from configuration or api.
- Provider checking for provider object before launching bot.
- Owner Only function working!
Security
- Upgraded required deno version to deno v1.20.3
0.1.3 - 2022-03-25
Major revamp fixes for library and modules with more permission handling.
Added
- NSFW Command checks
- Owner Only command checks
- development server only checks
- Documentation page for begging users.
- Rate limit handling for commands.
Changed
- Configuration object added 'required' to props. This will make it more clear to the end user which options are required or optional.
- Bot configuration options have not been given an option to enable and disable built in events
- Version control function name from validate to validateDenoVersion.
Fixed
- Bot will fetch application owners on start up and cache them.
- Permission handling for event handler. Events are enabled by default and the user can disable them if needed.
- Converted cooldown type names to rate limit for convenience, and understanding.
Security
- Added more permission checks and caching of the bot owner so we dont hit discord api ratelimit fetch request.
0.1.2 - 2022-03-24
Quality of life improvement and bug fixes
Added
- Error handling for more modules.
- CommandScopeType for command scope options.
Deprecated
- Removed command scope type Guild in favor of type Developments
Removed
- The internal events method is now becoming private. To avoid file import bugs, we will load it internally if the user wants to use it. If not they can disable it in the config settings.
Fixed
- Bug in logger emitting errors for unstable logs.
- The internal event handler was made to accept asynchronous functions.
- framework install url in documentation was incorrect.
- Bug with fileloader import paths
Security
- If fs loader throws an error, we will end the bot process and not continue loading the process.
0.1.1 - 2022-03-22
Quality of life improvements and documentation changes
Added
- Yoki section to the docs.
Changed
- Exporting only required classes from mod.ts and not everything.
- base urls for documentation not start with index.md and not a topic name.
Fixed
- A spelling mistake in the documentation.
0.1.0 - 2022-03-19
Initial release of AkumaKodo
Added
- Interaction Command handling
- Lots of util functions
Changed
- Added internal slash command handling using events. You can now enable or disable this.
- Logger Errors to warn on un-stable modes.
Removed
- For now, until slash commands are fully implemented, I will not focus on message-based commands. You will have to implement them yourself.
